Organization Level Approval Routing
Routing in FSDirect allows you to automate your approval process. It tells the system where to send a schedule for approval. Schedules can be automatically routed based on the Location, Building, Room, Organization or any combination of the four.
FSDirect offers two main ways to set up routing for Organization:
-
Organization Type Routing: This sets up a general approval path for all organizations that fall under a specific category (e.g., all "Sports Clubs").
-
Organization-Based Routing: This sets up a specific approval path for an individual organization (e.g., "Community Soccer League").
For example:
If a specific organization has a dedicated routing configuration, this will take always override the routing defined for its organization type. This ensures that routing conflicts are prevented.
For example:
-
Organization Type: Sports Clubs
-
Organization: Community Soccer League
In this scenario, if routing is established for both "Sports Clubs" (Organization Type) and "Community Soccer League" (Organization), any schedule created by Community Soccer League will be routed according to its specific Organization routing. All other organizations categorized as "Sports Clubs" will follow the Organization Type routing.
How to Set Up Organization-Based Routing
-
Click on the Account Setup tab.
-
Hover your mouse over the Shortcuts menu and click on the Setup Schedule Status Routes link.
-
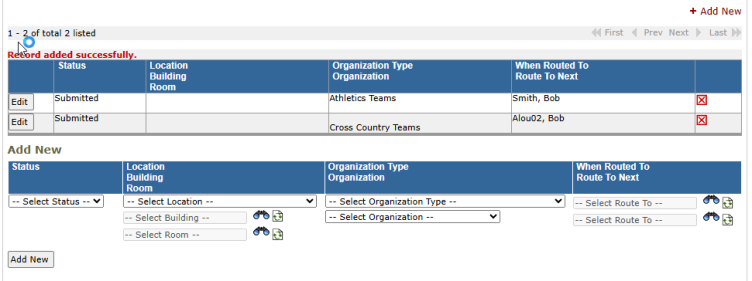
The first route that you will establish is one for any new request that has been Submitted into the system.
-
Under the Add New section, select Submitted from the Status drop-down menu.
-
Choose the name of the organization in the Organization drop-down box.
NOTE You can alternatively select an Organization Type, which will provide for routing to all Organizations of a specific type.
-
Leave the When Routed To drop-down blank.
-
Choose the name of the person responsible for the initial approval of the schedule for this organization in the Route To Next drop-down.
-
Click the Add New button to save. This route now moves up to the list of routes at the top of the page.
-
-
The second route that you will create will look very similar to the Submitted route. It tells the system who to send the request to once it has been approved by the first person in the route.
-
Under the Add New section, select Approved from the Status drop-down menu.
-
Choose the name of the organization in the Organization drop-down box.
-
In the When Routed To drop-down, select the name of the first approver. Choose the name of the second approver in the Route To Next drop-down.
NOTE The first approver's name should be the same approver listed in the Submitted route.
-
Click the Add New button to save. This route now moves up to the list of routes at the top of the page.
-
